Jacquard webbing for guitar straps
A guitar strap's motif should stay centred between its end pieces. Approve the visible repeat, backing feel and adjustment range with the actual attachment layout.
Content updated

In this guide
Key choices for your project
Choose the visible woven face together with the backing and end tabs. The decorative webbing may not be the part that attaches to the instrument. Approve the length range and logo position while the strap is worn, including the section hidden behind the player.
- Decorative face and backing
- Connection to end tabs
- Logo position when worn
Where should the motif begin across each sellable length?
One artwork repeat can look balanced on a long strap and awkward on a shorter size. Define a visual anchor at the front end tab, then prepare cut maps for every length and adjustment range. Review the shortest configuration as well as the product photograph position before approving production cutting.
- Motif anchor measured from the front tab
- Visible repeat at the shortest adjusted length
A centred motif can disappear after adjustment
Imagine a jacquard motif centred between leather end tabs at photo length. Shortening the strap hides the emblem beneath the adjuster and exposes reverse floats near clothing. Full backing covers them but hinders the doubled strap through the buckle.
Map the shortest, reference and longest configurations from a front-tab datum. Place repeats, adjuster and end-tab overlaps on each map. Weave the intended face, then compare an exposed reverse, selective backing and full backing through actual hardware. Wear and adjust each assembly while checking motif position, shoulder contact, snagging, thickness and end-joint distortion.
Approve motif placement, reverse treatment and hardware movement across the sellable adjustment range, using complete strap assemblies with their actual end tabs.
Products to start with
Open a product to see its listed specification. Custom colours, dimensions and order terms are confirmed for your project.
More product photos
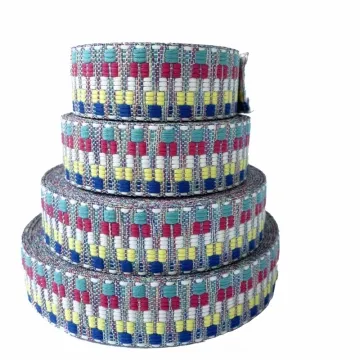
Will reverse floats catch on clothing or hardware?
Inspect the jacquard reverse before adding backing. Long floats can snag at the adjuster or show through an open construction, while a full lining changes thickness and bending. Thread the proposed layer stack through the actual hardware and compare exposed, selectively covered and fully backed samples.
- Float length near the adjustment path
- Finished layer thickness through the hardware
Specify artwork, layers and adjustment as one strap
Tie the decorative repeat to wearable lengths, reverse exposure, hardware and the end-tab joint.
Swipe to see all columns ↔
| Field | What to record | How to confirm |
|---|---|---|
| Wear configurations | Shortest, reference and longest lengths, front orientation and shoulder zone | Lay out the completed strap |
| Jacquard construction | Fibre, weave, finished width, thickness, edge, face, reverse and hand | Retain a marked woven trial |
| Artwork placement | File revision, finished scale, repeat, front-tab datum and permitted cut positions | Prepare a cut map per length |
| Reverse treatment | Float limits, exposed zones, selective cover or full backing and layer direction | Build each proposed layer option |
| Hardware and ends | Adjuster, connector, end-tab material, insertion, overlap, fold and stitch layout | Thread and sew production parts |
| Assembly acceptance | Adjustment, motif visibility, clothing contact, snagging, edge feel and joint change | Wear and operate the finished strap |
The buyer defines representative instrument, wearing conditions and assembly acceptance. Tape data alone is not a safe load rating for the finished strap.
Download specification worksheet ↓Develop the motif through every wearable length
Map adjustment extremes
Draw the complete strap at shortest, reference and longest settings from one front-tab datum, including hidden and shoulder zones.
Place full repeats
Overlay artwork repeats, allowed cuts, adjuster travel and tab overlaps, then review motif visibility in each mapped configuration.
Build reverse options
Weave the marked trial and assemble exposed, selectively backed or fully backed candidates through the intended hardware and end tabs.
Wear, adjust and inspect
Operate each complete strap with representative instrument and clothing, recording motif position, comfort, snagging, hardware movement and joint distortion.
Shortcuts that hide guitar-strap conflicts
Centring only at photo length
Adjustment moves motifs beneath hardware and behind the player. Map every sellable extreme from a fixed end-tab datum.
Ignoring the jacquard reverse
Long floats may snag clothing or hardware, while backing changes thickness and bend. Compare reverse-treatment options as assemblies.
Approving from strip strength
End tabs, stitches, adjuster and instrument connectors complete the load path. Evaluate the whole strap under buyer-defined conditions.
Questions before you choose
Is jacquard webbing comfortable enough for a guitar strap?
Comfort depends on strap width, stiffness, reverse texture and instrument weight. Jacquard can add a distinctive face, but the back may contain floats or a different hand. Test the finished strap on clothing and shoulder, including edge feel after prolonged use.
How should patterned webbing be joined to guitar strap end tabs?
Design the joint around tab material, overlap, stitch layout and strap thickness. Keep the visible motif centred before it disappears under the tab. Pull and flex the complete joint, then inspect needle damage, edge movement and distortion at the transition.
Tell us what you are making
You can enquire before every detail is settled. Tell us the intended use and what you need help choosing; add dimensions or quantities if you know them.
What happens after your enquiry
We review the intended use and open specification questions first. Sample options, costs, minimum quantities and timing can then be discussed against that brief. Sending an enquiry does not place an order.
Request a relevant sample →