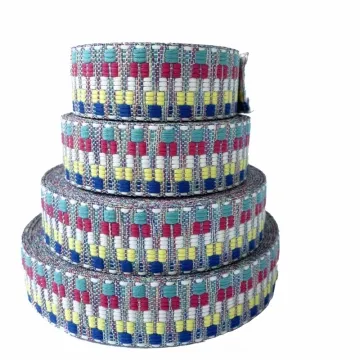
Custom jacquard webbing with logos
A woven logo needs room for its smallest details. Share the artwork at finished width, including the repeat and reverse appearance, before committing to a colour count.
Content updated

In this guide
Key choices for your project
A jacquard logo is formed by the yarn arrangement, so fine lines and colour changes need a weaving trial. Check the reverse as well as the face: floats, colour carry-through and stiffness can matter when the strap twists in use.
- Smallest readable logo detail
- Reverse-side yarn floats
- Repeat placement at a buckle
A readable logo can distort at folds and seams
Imagine a clear jacquard logo on a straight sample. At finished width, small letter counters begin to close. The densest motif crosses an attachment seam, compresses differently from the ground weave and leaves a visible step. When the strap twists through its buckle, reverse-side floats and carried colours face outward.
Place actual-size artwork on the strap layout. Weave the proposed construction, then sew trials through the busiest motif and a plain interval. Fold, cut and thread the tape as intended, reviewing face and reverse from normal viewing positions before fixing repeat placement.
Approve logo clarity, seam behaviour and reverse exposure on an assembled actual-size trial rather than a flat artwork view.
Keep dense logo areas out of critical seams
Place the sewing path over the artwork at finished scale. A dense woven letter or colour boundary can feed and compress differently from the ground area, leaving a visible step or shifting the seam. Make one assembled trial with the stitch line crossing the busiest motif and another through the plain interval before fixing placement.
- Seam appearance across the densest motif
- Logo clearance from folded attachment zones
Specify acceptable reverse-side handling
Decide whether the reverse will touch clothing, pass through hardware or remain enclosed. Photograph the approved back at finished scale and mark any yarn float or colour carry that must stay away from cut and stitch zones. This gives production a usable acceptance reference without promising that both faces are visually identical.
- Approved reverse-face photograph at actual scale
- Float-free zone at cuts and stitch lines
Create a woven and assembled reference
Record the weave, repeat and every zone that cuts, folds, stitches or shows the reverse.
Swipe to see all columns ↔
| Field | What to record | How to confirm |
|---|---|---|
| Artwork master | Revision, finished scale, colours, minimum strokes and simplified option | View the file at actual tape width |
| Tape construction | Fibre, weave, ground, border, finished width and thickness | Retain an identified woven trial |
| Face and reverse | Required face, acceptable reverse, floats and colour carry-through | Photograph both sides at finished scale |
| Repeat layout | Repeat length, motif spacing, start point and allowed cutting interval | Overlay on the full strap pattern |
| Assembly zones | Fold, seam, hardware and contact areas across the motif | Build dense and plain-area seam trials |
| Approval reference | Lighting, viewing distance, sample identity and approved revision | Keep artwork and physical sample linked |
Legibility and reverse appearance depend on the proposed construction and remain buyer-defined for the finished product.
Download specification worksheet ↓Move from logo file to woven strap assembly
Prepare actual-size options
Place the original and any simplified artwork at finished tape width, checking open counters, stroke spacing and border clearance.
Weave an identified trial
Use the proposed yarns, colours and construction for later comparison, then label the face, reverse, repeat start and approval revision.
Cross dense and plain zones
Sew comparable attachment trials through the busiest motif and ground interval, observing feeding, compression, seam position and visible steps.
Fold, thread and view
Cut, fold and pass the tape through intended hardware, then inspect logo continuity and reverse exposure from normal product angles.
Shortcuts that hide jacquard assembly limits
Approving enlarged screen artwork
Zoomed graphics conceal closed counters and crowded strokes at finished width. Judge an actual-size woven trial and retain a simplified option.
Assuming both faces match
Jacquard floats and carried colours often make the reverse different. Specify acceptable handling and review every product position where it appears.
Keeping seams off the review
Dense motifs can feed or compress differently from ground weave. Stitch through both zones before fixing logo placement around attachments.
Questions before you choose
Will small lettering in my logo weave clearly on jacquard webbing?
It depends on finished tape width, letter height, stroke spacing, yarn size and weave. View the artwork at actual size and prepare a simplified logo option. A weaving trial is the reliable way to judge whether counters stay open and letters remain readable.
Can jacquard logo webbing look the same on both sides?
Not by default. Yarn floats, colour carry-through and motif structure often make the reverse different from the face. If both sides will show, mark the required appearance in the brief and review a twisted strap with the buckle and repeat placement.
Products to start with
Open a product to see its listed specification. Custom colours, dimensions and order terms are confirmed for your project.
More product photos
Tell us what you are making
You can enquire before every detail is settled. Tell us the intended use and what you need help choosing; add dimensions or quantities if you know them.
What happens after your enquiry
We review the intended use and open specification questions first. Sample options, costs, minimum quantities and timing can then be discussed against that brief. Sending an enquiry does not place an order.
Request a relevant sample →